02. Introduction to GPU Workspaces

## Introduction
Udacity Workspaces with GPU support are available for some projects as an alternative to manually configuring your own remote server with GPU support. These workspaces provide a Jupyter notebook server directly in your browser. This lesson will briefly introduce the Workspaces interface.
Important Notes:
- Workspaces sessions are connections from your browser to a remote server. Each student has a limited number of GPU hours allocated on the servers (the allocation is significantly more than completing the projects is expected to take). There is currently no limit on the number of Workspace hours when GPU mode is disabled.
- Workspace data stored in the user's home folder is preserved between sessions (and can be reset as needed, e.g., to get project updates).
- Only 3 gigabytes of data can be stored in the home folder.
- Workspace sessions are preserved if your connection drops or your browser window is closed, simply return to the classroom and re-open the workspace page; however, workspace sessions are automatically terminated after a period of inactivity. This will prevent you from leaving a session connection open and burning through your time allocation. (See the section on active connections below.)
- The kernel state is preserved as long as the notebook session remains open, but it is not preserved if the session is closed. If you exit the notebook for more than half an hour and the session is closed, you will need to re-run any previously-run cells before continuing.
## Overview
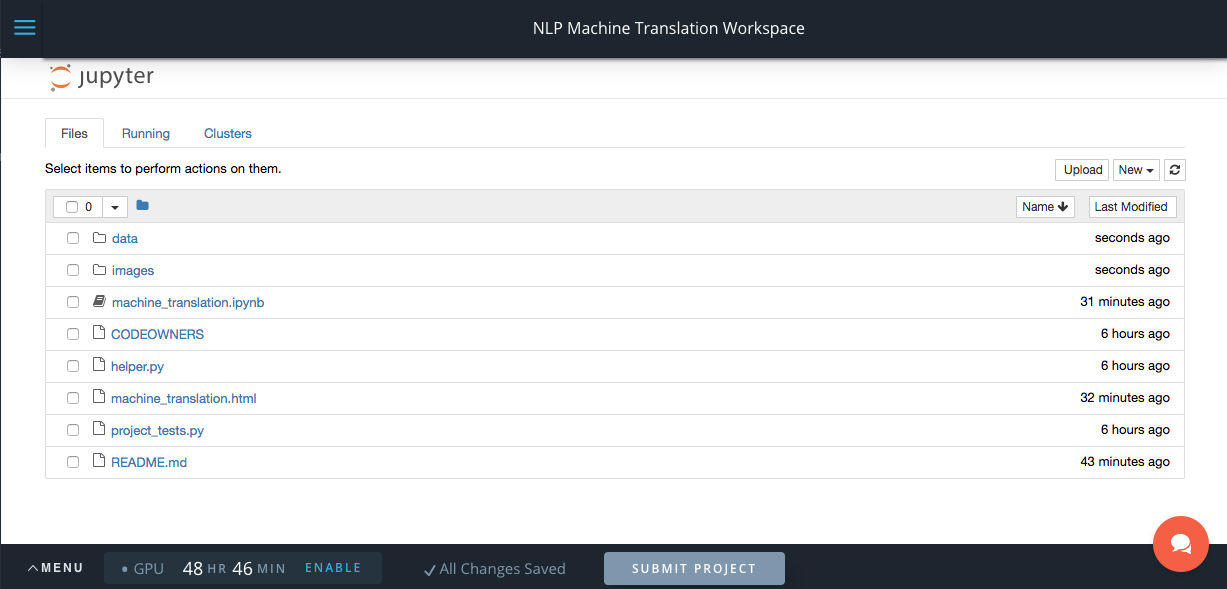
The default workspaces interface
When the workspace opens, you'll see the normal Jupyter file browser. From this interface you can open a notebook file, start a remote terminal session, enable the GPU, submit your project, or reset the workspace data, and more. Clicking the three bars in the top left corner above the Jupyter logo will toggle hiding the classroom lessons sidebar.
NOTE: You can always return to the file browser page from anywhere else in the workspace by clicking the Jupyter logo in the top left corner.
## Opening a notebook
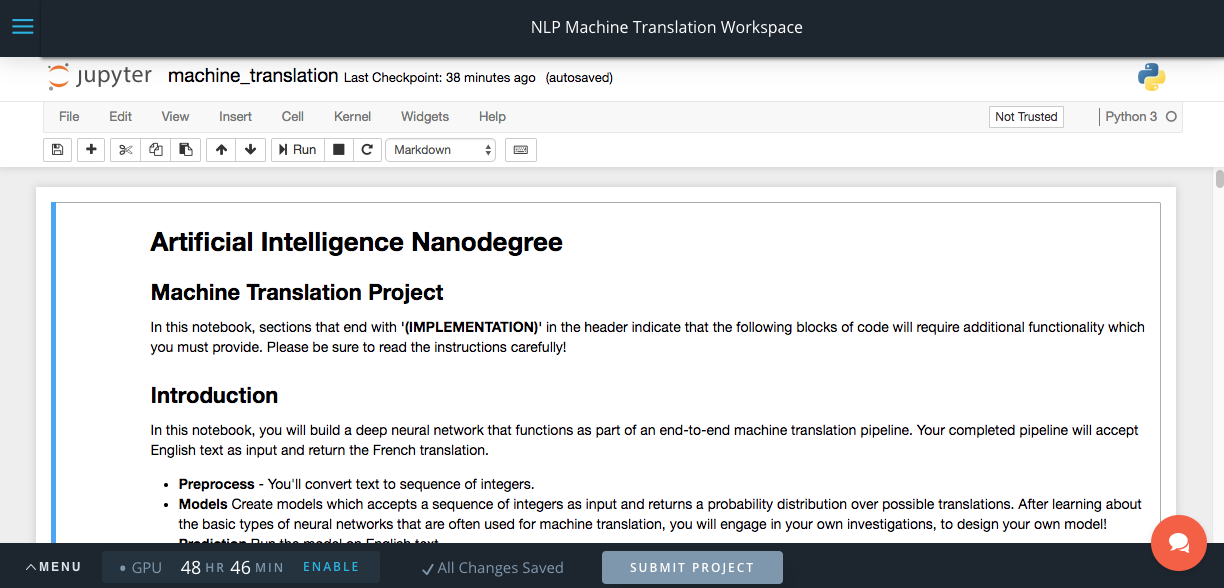
View of the project notebook
Clicking the name of a notebook (*.ipynb) file in the file list will open a standard Jupyter notebook view of the project. The notebook session will remain open as long as you are active, and will be automatically terminated after 30 minutes of inactivity.
You can exit a notebook by clicking on the Jupyter logo in the top left corner.
NOTE: Notebooks continue to run in the background unless they are stopped. IF GPU MODE IS ACTIVE, IT WILL REMAIN ACTIVE AFTER CLOSING OR STOPPING A NOTEBOOK. YOU CAN ONLY STOP GPU MODE WITH THE GPU TOGGLE BUTTON. (See next section.)
## Enabling GPU Mode
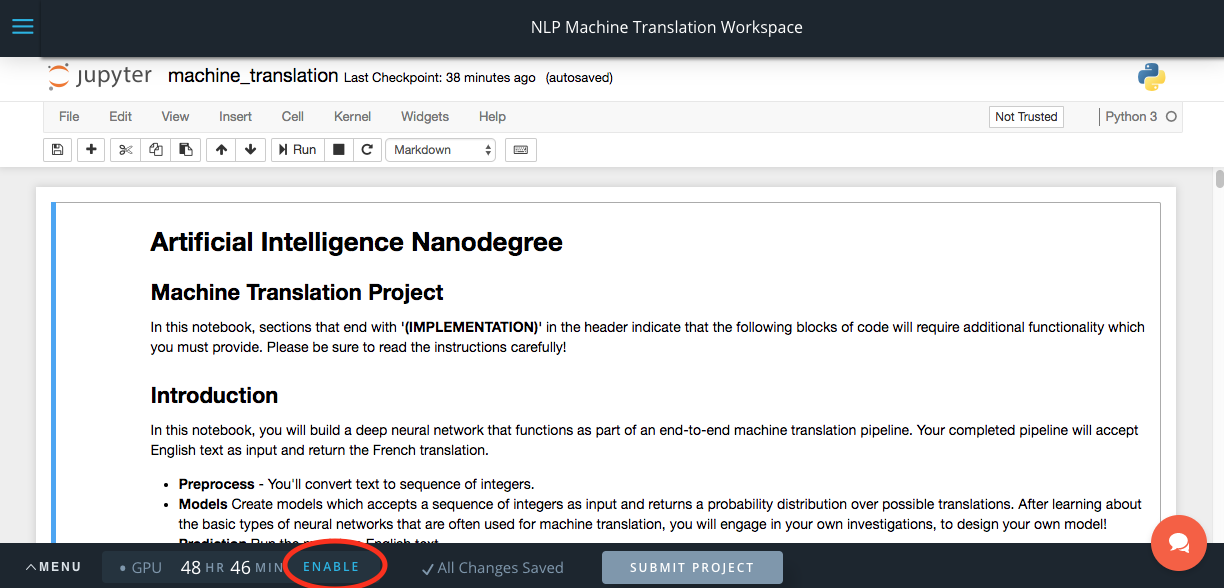
The GPU Toggle Button
GPU Workspaces can also be run without time restrictions when the GPU mode is disabled. The "Enable"/"Disable" button (circled in red in the image) can be used to toggle GPU mode. NOTE: Toggling GPU support may switch the physical server your session connects to, which can cause data loss UNLESS YOU CLICK THE SAVE BUTTON BEFORE TOGGLING GPU SUPPORT.
NOTE THAT THIS WORKSPACE CANNOT BE RUN WITHOUT THE GPU SUPPORT.
ALWAYS SAVE YOUR CHANGES BEFORE TOGGLING GPU SUPPORT.
## Keeping Your Session Active
Workspaces automatically disconnect after 30 minutes of user inactivity—which means that workspaces can disconnect during long-running tasks (like training neural networks). We have provided a utility that can keep your workspace sessions active for these tasks. However, keep the following guidelines in mind:
- Do not try to permanently hold the workspace session active when you do not have a process running (e.g., do not try to hold the session open in the background)—the limits are in place to preserve your GPU time allocation; there is no guarantee that you'll receive additional time if you exceed the limit.
- Make sure that you save the results of the long running task to disk as soon as the task ends (e.g., checkpoint your model parameters for deep learning networks); otherwise the workspace will disconnect 30 minutes after the active process ends, and the results will be lost.
The workspace_utils.py module (available here) includes an iterator wrapper called keep_awake and a context manager called active_session that can be used to maintain an active session during long-running processes. The two functions are equivalent, so use whichever fits better in your code. NOTE: The file may be incorrectly downloaded as workspace-utils.py (note the dash instead of an underscore in the filename). Make sure to correct the filename before uploading to your workspace; Python cannot import from file names including hyphens.
Example using keep_awake:
from workspace_utils import keep_awake

for i in keep_awake(range(5)):  #anything that happens inside this loop will keep the workspace active
    # do iteration with lots of work here
Example using active_session:
from workspace_utils import active_session

with active_session():
    # do long-running work here
## Submitting a Project
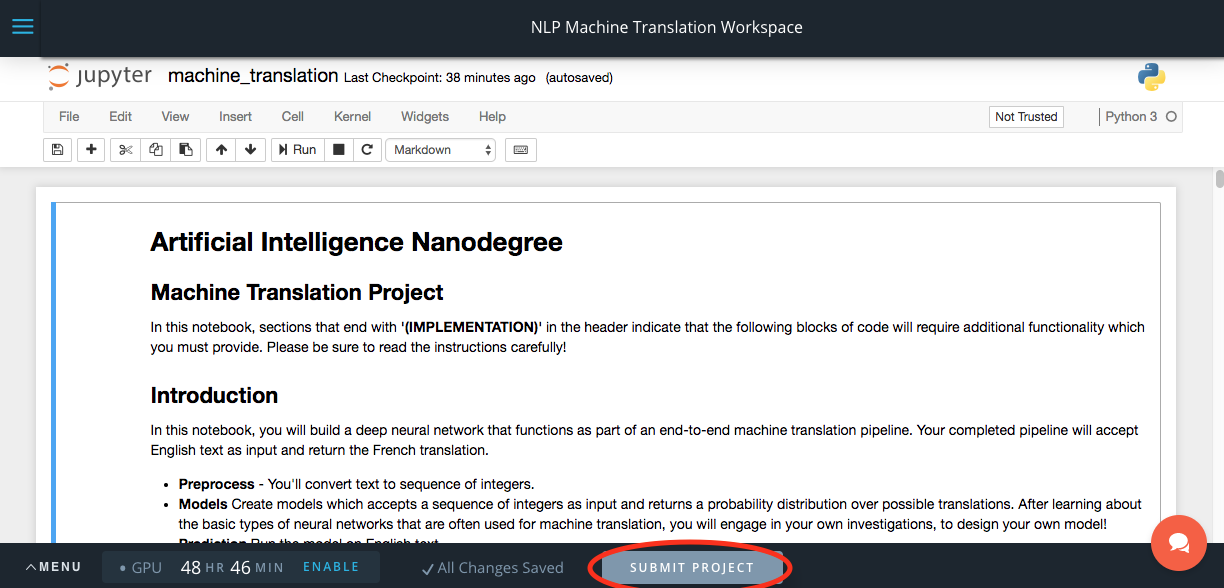
The Submit Project Button
Some workspaces are able to directly submit projects on your behalf (i.e., you do not need to manually submit the project in the classroom). To submit your project, simply click the "Submit Project" button (circled in red in the above image).
If you do not see the "Submit Project" button, then project submission is not enabled for that workspace. You will need to manually download your project files and submit them in the classroom.
NOTE: YOU MUST ENSURE THAT YOUR SUBMISSION INCLUDES ALL REQUIRED FILES BEFORE SUBMITTING -- INCLUDING ANY FILE CONVERSIONS (e.g., from ipynb to HTML)
## Opening a Terminal
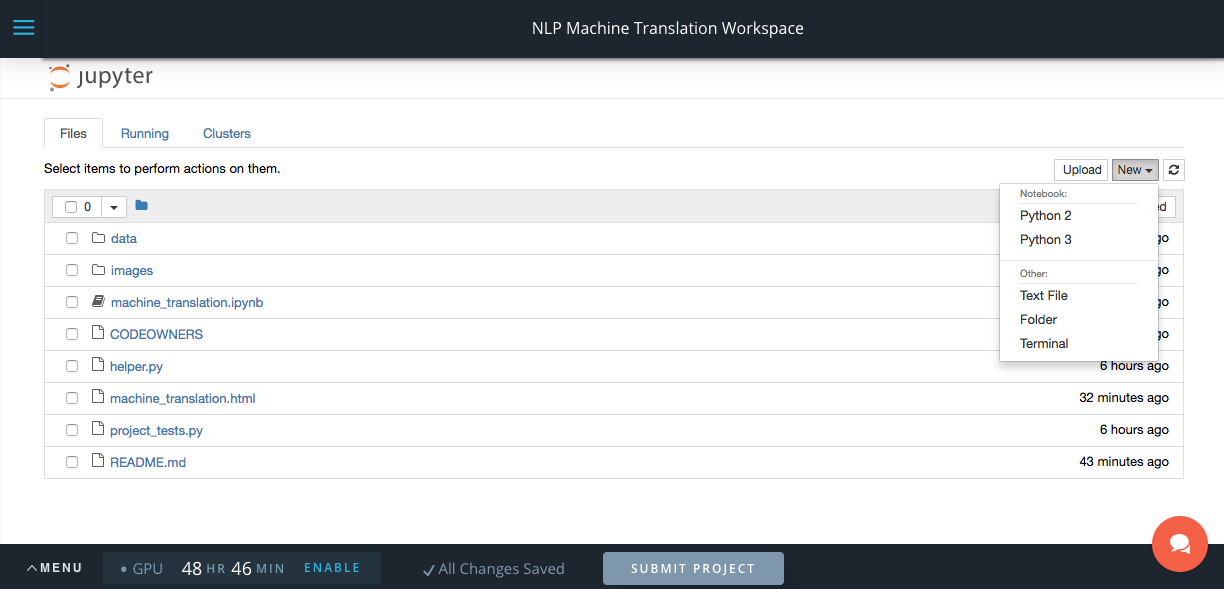
The "New" menu button
Jupyter workspaces support several views, including the file browser and notebook view already covered, as well as shell terminals. To open a terminal shell, click the "New" menu button at the top right of the file browser view and select "Terminal".
## Terminals
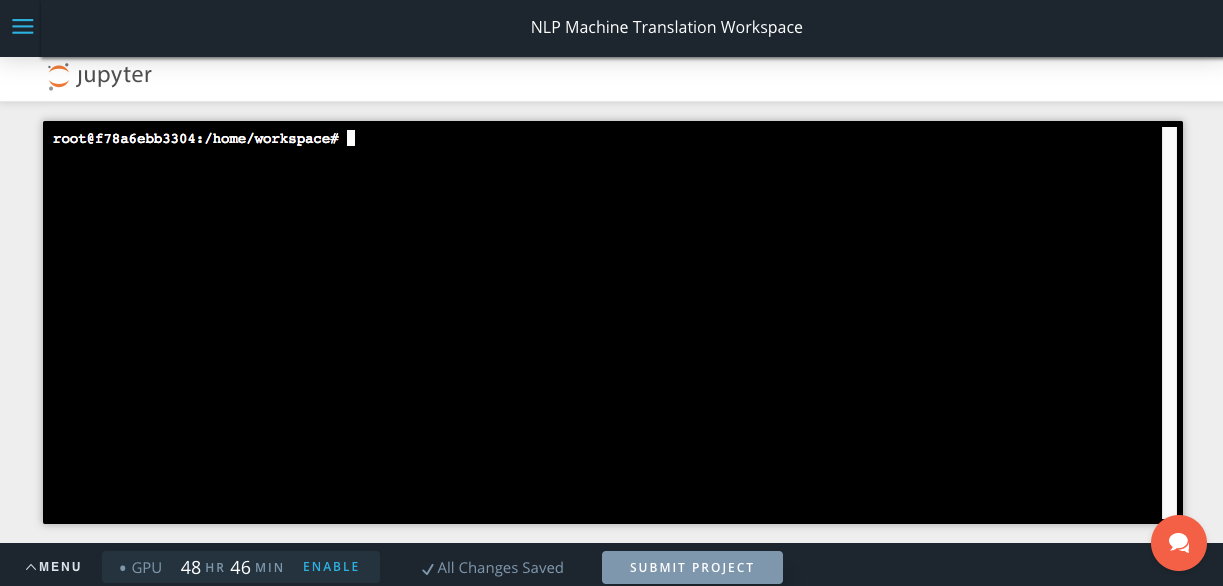
Jupyter terminal shell interface
Terminals provide a full Bash shell that you can use to install or update software packages, fetch updates from github repositories, or run any other terminal commands. As with the notebook view, you can return to the file browser view by clicking on the Jupyter logo at the top left corner of the window.
NOTE: Your data & changes are persistent across workspace sessions. Any changes you make will need to be repeated if you later reset your workspace data.
## Resetting Data
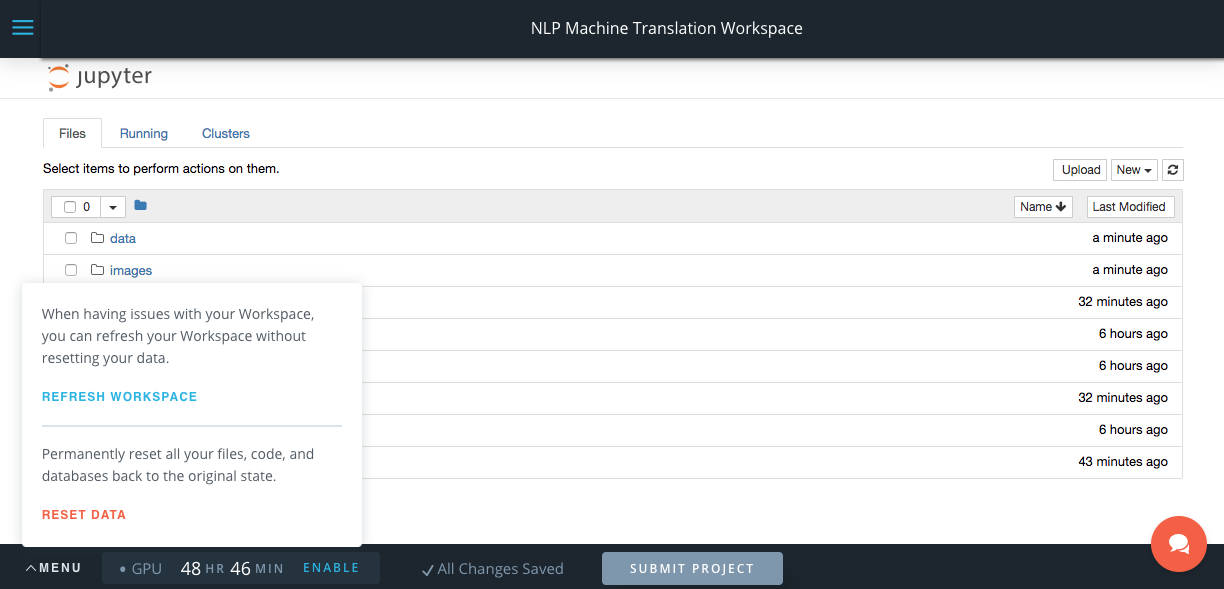
The Menu Button
The "Menu" button in the bottom left corner provides support for resetting your Workspaces. The "Refresh Workspace" button will refresh your session, which has no effect on the changes you've made in the workspace.
The "Reset Data" button discards all changes and restores a clean copy of the workspace. Clicking the button will open a dialog that requires you to type "Reset data" in a confirmation dialog. ALL OF YOUR DATA WILL BE LOST.
Resetting should only be required if Udacity makes changes to the project and you can't get them via git pull, or if you destroy the contents of the workspace. If you do need to reset your data, you are strongly encouraged to download a copy of your work from the file interface before clicking Reset Data.